![[Previous]](prev.gif) |
![[Contents]](contents.gif) |
![[Index]](keyword_index.gif) |
![[Next]](next.gif) |
|
|
|
|
 |
This version of this document is no longer maintained. For the latest documentation, see http://www.qnx.com/developers/docs. |
Once you've created or opened an application, you'll probably want to add, delete, and modify widgets. This chapter describes how to work with widgets.
It includes: |
For information on using specific widget classes,
see:
Since widgets inherit a lot of behavior from their parent classes, you should make yourself familiar with the fundamental classes: PtWidget, PtBasic, PtContainer, and so on. |
There are two major types of widgets:
Container-class widgets can contain other widgets--including other containers. Widgets placed inside a container are known as child widgets; the hierarchy resulting from this nesting is called the widget family. Container widgets can look after sizing and positioning their children, as described in the Geometry Management chapter.
When working with container-class widgets in PhAB, remember the following:
For more info, see "Selecting widgets" in this chapter.
If your program has to interact with a widget, that widget must have a unique instance name. Using this name, PhAB generates a global variable and a manifest that let you easily access the widget from within your code.
To view or edit a widget's instance name, use the Widget Instance Name field at the top of the Resources or Callbacks control panel:

Editing a widget's instance name.
|
|
You can optionally include the instance name in the widget's memory. See "Other Generate options" in the Working with Applications chapter.
When you create a widget, PhAB automatically gives it a default instance name. Typically, this default name is the widget's class name. For example, if you create a PtButton-class widget, the Resources and Callbacks control panels display PtButton as the instance name.
If a widget simply serves as a label or window decoration, it doesn't have to be accessed from within your application code. So you should tell PhAB to ignore the widget's instance name during code generation. To do this:
Or:
You should give a widget a unique name if:
|
To keep the number of global variables to a minimum, don't give a widget a unique name unless you really need to access the widget from within your application. If you've given a widget a name and later decide you don't need the name, just change it back to the widget's class name or blank it out. |
As described in the chapter on International Language Support, you'll need an instance name for every text string in your application's user interface. These instance names aren't needed in your code.
To indicate that an instance name isn't required for code generation, start the name with the @ character. PhAB recognizes such a name when generating the text language database, but skips over it when generating code.
If you don't want to create a unique instance name for a string that's to be translated, specify a single @ character for the instance name; PhAB appends an internal sequence number to the end.
If you don't want to create unique instance names, but you want to organize the text for translation (say by modules), you can give the strings the same instance name, and PhAB will append a sequence number to it. For example, if you assign an instance name of @label to several strings, PhAB generates @label, @label0, @label1, ... as instance names.
PhAB resets the instance name of a widget back to the widget class name if it detects a duplicate name when you:
To create a widget:
|
Widgets snap to the grid if it's enabled.
See
"Grid preferences"
in the chapter on PhAB's environment.
To improve your application's performance, avoid overlapping widgets that are frequently updated. |
You can also create a widget by dragging its icon from the widget palette to the Module Tree control panel. Where you drop the icon determines the widget's place in the family hierarchy.
Once you've created a widget, you're returned to select mode. To stay in create mode so you can create several widgets of the same type:
To cancel create mode without creating a widget:
Or:
In this section we look at:
When PhAB is in select mode, the pointer appears as an arrow. To put PhAB into select mode:
Or:
Or:
To select a single widget, you can:
Or:
These methods are described below.
To select a single widget using point and click:
To select the parent of a widget, hold down Shift-Alt and click on the widget. This is a handy way to select a PtDivider or PtToolbar.
|
You must press Shift and then Alt for this method to work. |
The Next and Previous buttons in the Resources and Callbacks control panels let you select any widget in the current module.
| To select the: | Click on: | Or press: |
|---|---|---|
| Previous widget in the current module |
|
F9 |
| Next widget in the current module |
|
F10 |
The Module Tree control panel displays a tree of all the widgets in the module. Using this tree, you can:
To select a widget from the tree, click on the widget's name.
To select multiple widgets, you can:
Or:
Or:
|
When you select two or more widgets, the Resources control panel displays only the resources that those widgets have in common. Editing any of these resources affects all the selected widgets. |
PhAB uses two colors to show selected items if the Show Selection option is selected in the View menu. The colors can be customized in the Preferences dialog.
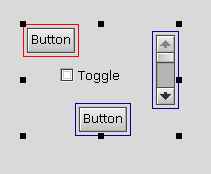
Multiple selected widgets.
In the example above, the toggle widget is not selected, it just happens to be in the same area as the selected widgets. The widget highlighted by red is the first widget in the selection. The widgets highlighted by blue are the rest of the widgets in the selection. If you use an align or match command, the first selected widget is the source widget.
A bounding box lets you select several widgets all at once:
To add or remove a widget from the current list of selected widgets, hold down Shift and click on the widget. This is also known as the extended selection method.
If the widget isn't already selected, it's added to the list. If the widget is already selected, it's removed from the list.
|
The above methods for selecting multiple widgets work only for widgets at the same hierarchical level. For example, let's say you've just selected two buttons inside a window. You can't extend that selection to include a button that's inside a pane. |
To select multiple widgets, using the Resources or Callbacks control panel's Next and Previous buttons:
Every time you click, PhAB adds the next widget in the current module to your selection.
To remove the last widget from the current list of selected widgets:
Every time you click, PhAB removes another widget.
To select a widget inside a group, you can use the next and previous buttons in the Resources or Callbacks control panel, or use the Module Tree control panel.
To select a single widget within a group, using the Module Tree control panel:
To select one or more widgets within a group, using the Next and Previous buttons:
If you can't find a widget (it may be hidden behind another widget or is outside the boundaries of its container), do the following:
For more information on the toolbars and control panels, see the chapter on PhAB's environment.
You can align several widgets to another widget or to their parent container.
For simple alignments, select the Align icon from PhAB's toolbar:

and then choose the alignment from the pop-up menu.
For more complicated alignment options, bring up the Align Widgets dialog by:
Or:
Or:
When you use this method to align widgets, the widgets are aligned to the first widget you select, which is highlighted differently from the other widgets in the selection if the Show Selection option is set in the View menu. To align to another widget:
To align widgets to their parent container:
|
If you choose both vertical and horizontal options, be sure to click on both Align to Container buttons. |
When aligning widgets to a container you may want the widgets to retain their relative positions to each other. To do this:
You can quickly and easily distribute widgets horizontally or vertically, to evenly space them out on the GUI. To do this:
In the following example, several buttons have been distributed horizontally and aligned to the top edge:

Distributed widgets.
Common User Access (CUA) is a standard that defines how a user can change the keyboard focus. A widget is focusable if it can be given focus by pressing CUA keys or by calling a focus function.
The following keys move focus only to focusable widgets:
| To go to the: | Press: |
|---|---|
| Next widget | Tab |
| Previous widget | Shift-Tab |
| First widget in the next container | Ctrl-Tab |
| Last widget in the previous container | Ctrl-Shift-Tab |
For information on specifying the order in which the widgets are traversed, see the section "Ordering widgets" in this chapter.
Use the following Pt_ARG_FLAGS flags to control focus for a widget:
In addition, use the following Pt_ARG_CONTAINER_FLAGS flags to control focus for a container:
All descendants of the PtBasic widget have the following callback resources:
For more information, see the Widget Reference.
The functions listed below deal with focus. They're described in the Photon Library Reference.
These functions don't actually change which widget has focus; they tell you where focus can go:
You can use these routines to determine which widget has focus:
You can use these routines to give focus to a widget:
In PhAB, each widget exists in front of or behind other widgets. This is known as the widget order, and you can see it when you overlap several widgets. The order of the widgets dictates how you can use the CUA keys to move between widgets.
|
If you're not using PhAB, the widget order is the order in which the widgets are created. To change the order, see "Ordering widgets" in the Managing Widgets in Application Code chapter. |
To view the widget order, do one of the following:
Or:
The easiest way to reorder the widgets is to use the Module Tree control panel -- just drag the widgets around until they're in the order you want.
You can also use the Shift-select method to reorder the widgets:

PhAB places the widgets in the order you selected them.
You can also select one or more widgets and then use the Raise and Lower icons to change the widget order:

Dragging a widget is the easiest way to move a widget in most situations since it's quick and fairly accurate:
If you want to drag the widgets horizontally, vertically, or diagonally, hold down the Alt while dragging.
|
To drag a container horizontally, vertically, or diagonally, press Alt after pressing the mouse button. (Pressing Alt before the mouse button selects widgets within the container.) |
To cancel a drag operation, press Esc before releasing the mouse button.
To move the parent container of a widget, hold down Shift-Alt and drag the child.
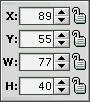
Widgets may "disappear" if you move them beyond the boundaries of their container. If this happens, use the Previous and Next buttons in the Resources or Callbacks control panel to select the widgets, then use the X and Y fields in PhAB's toolbar to bring the widgets back into view.
If you find that you're unintentionally dragging widgets when you're just trying to select them, consider:
For more information, see "Toolbars" in the chapter on PhAB's Environment.
There are several preferences that you can set for dragging (see the "Customizing your PhAB environment" section in the chapter on PhAB's environment):
To place one or more widgets at specific coordinates:
To move one or more widgets directly from one container or module to another:
Or:
Or:
When you select a widget or module, you'll see its height and width--including any borders and margins--displayed in the toolbar's H and W fields. (These values are maintained by the Pt_ARG_DIM resource; see the description of PtWidget in the Widget Reference.)
To resize a selected widget, do one of the following:
Or:
Or:
|
If a module is in Test mode, you can't resize it or its widgets.
If you have trouble seeing a widget's resize handles because of the background color you've chosen, you can change the resize-handle color. For more info, see "Customizing your PhAB environment" in the PhAB Environment chapter. |
PhAB's clipboard lets you cut, copy, and paste widgets and modules between PhAB instances. You can't use this clipboard with other applications. To do use the clipboard, open two PhAB instances, copy or cut something into clipboard in one instance, and then paste it into the other instance.
You'll find the clipboard helpful for these reasons:
A cut operation removes the currently selected widgets from their module and places them in the clipboard. A copy operation copies the currently selected widgets to the clipboard without removing them from their module.
|
Whenever you cut or copy, PhAB deletes any widgets already in the clipboard. |
To cut or copy one or more widgets:
Or:
Or:

Or:
Or:

|
|
A paste operation copies widgets from the clipboard into a module.
To paste the contents of the clipboard:
Or:
Or:

|
|
Here's a quick and easy way to duplicate a widget or container (it's much simpler than using the clipboard):
If you want to duplicate many widgets at once:
|
If you duplicate a container, all its children are duplicated as well. |
Duplicating is achieved using a copy to clipboard operation and paste from clipboard, that are done internally. Therefore the rules for clipboard operations about instance names and callback are also valid for duplicating widgets.
|
|
To permanently remove one or more selected widgets, or to delete a module:
If you want put the widgets or module somewhere else, you should cut them, not delete them. For more information, see the section on the clipboard in this chapter.
You can copy the resources or callbacks from one widget to one or more other widgets by using the Matching feature. This features lets you quickly and easily create several widgets with similar appearances and behavior.
To use the matching feature:
|
If you enable the Show Selection option in the View menu, the widget selected first highlighted with a different color than other selected widgets. |
|
Geometry related resources -- Pt_ARG_POS, Pt_ARG_DIM, Pt_ARG_AREA -- are not copied. |
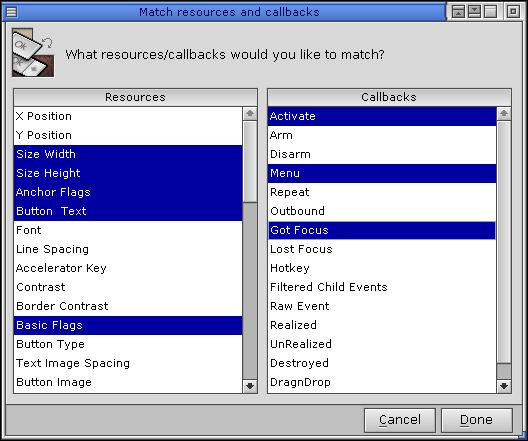
Match resources and callbacks dialog.
PhAB lets you import several kinds of graphic files into your application. For more information, see "Importing files" in the Working with Applications chapter.
|
PhAB doesn't export graphic files directly. That's because any imported file is saved with the module in a PhAB-specific format. |
The Pixmap editor (described in the Editing Resources and Callbacks in PhAB chapter) also lets you import graphics: select the widget you want to add the image to, edit its image, and choose the pixmap editor's Import button.
You can change the class of a widget by selecting it and then choosing Change Class from the Widget menu. Choose the new class from the pop-up list, and then click the Change class button.
The resources and callbacks that are compatible with the new widget class are kept, along with their values. For example, if you decide that a PtMultitext better suits your needs than a PtButton, you can select the button, open the Change class dialog by right-clicking on the widget, or right-clicking in the Module tree or by choosing Change Class from the Widget menu. The widget's position, size, Pt_ARG_TEXT_STRING, and all the other resources common to the old and new classes are kept.
|
When you change a widget's class, some resources and callbacks might be deleted. Before proceeding, a dialog displays the number of resources and callbacks that will be removed. You have a chance to cancel the operation. |
A container that has children (such as a PtPanel with some widgets inside it) can be converted this way, but the list of possible new classes you can choose from is restricted to compatible container classes. For instance a PtPane with a button inside can be changed into a PtBkgd, but not into a PtList or PtTree. An empty PtTree or any other empty container can be changed into anything, including into non-container widgets. A PtTree that has a child (a PtDivider) can be changed into a container widget.
A template is a customized widget, group or hierarchy of widgets that you want to use as the basis for other widgets. Templates are useful when you want to create many widgets that look and behave alike. PhAB automatically loads your templates, so you can easily create instances of your widgets in any application.
You can build and save your own collection of template widgets. Templates can be customized buttons, labels, sliders, backgrounds, standard dialogs and windows. You can include callbacks in templates.
Customized templates are not any different from the standard templates in the Widgets palette. In fact, when you create a template, you save it as a personal template (visible only to you) or as a global PhAB template (visible in all PhAB instances).
This section includes:
To create a template:
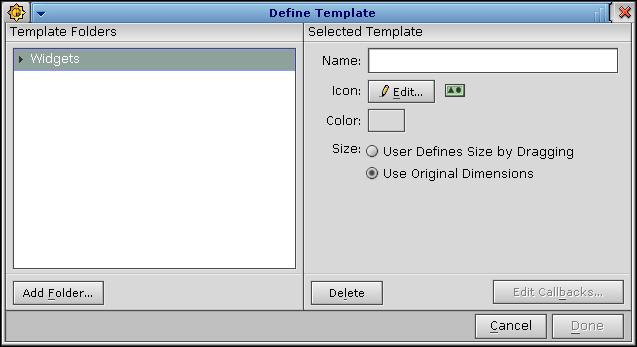
The dialog for creating new templates.
To create a new folder, click on Add Folder. The Setup folders dialog appears:
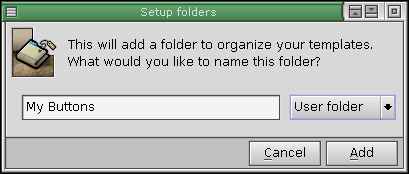
Enter a folder name and select its type: User folder or PhAB folder. A User folder is visible only to you and cannot be shared with other PhAB users. A PhAB folder can be shared by several PhAB users. The predefined Widgets folder is a PhAB folder.
|
You need to have special permissions in order to create or to change a PhAB folder. |
Each folder pops up as a palette, beside the widget palette. You can view or hide them using ; this menu contains a list of all defined templates. When you launch PhAB, all the palettes pop up by default.
|
You can create an icon by clicking Icon Edit. |
You can specify whether PhAB prompts you with a list of included callbacks when you instantiate a template widget that contains callbacks. This setting is set on the General tab of the Preferences dialog under the When created widgets contain callbacks option. If you select Automatically add callbacks, all callbacks are added. If you select Ask me, PhAB prompts you with a list of callbacks that you can select from.
You can create a new widget template from scratch, without starting from an existing template. If there is no template available for a widget class (for example, if you just created a brand new widget class), then you must instantiate the widget, then create the a template from the widget instance. See the Building Custom Widgets guide for information about building a widget and creating a widget description table.
To instantiate a widget class and then create a template:
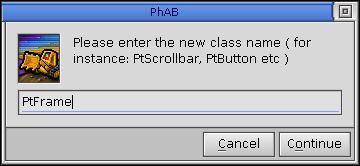
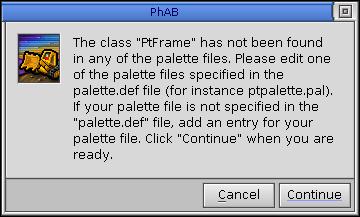
PhAB scans the palette definition files for the widget's description table. Palette definition files (*.pal are listed in palette.def. If you have written a new *.pal file containing your widget's description table, you should add it to palette.def.
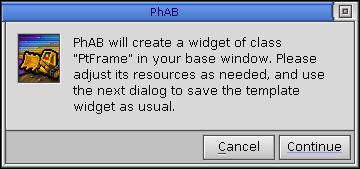
If no widget definition is found, this dialog appears:
You can change a template definition at any time by editing the templates. To edit an existing template:
You can change the template's name, the template's folder name, and the template's icon. Using drag and drop, you can move the templates between folders, and you can reorder the templates inside the same folder. Note that you can only move a template between folders of the same type (e.g. from a User folder to a User folder).
To delete a template:
|
|
|
|

