![[Previous]](prev.gif) |
![[Contents]](contents.gif) |
![[Index]](keyword_index.gif) |
![[Next]](next.gif) |
|
|
|
|
 |
This version of this document is no longer maintained. For the latest documentation, see http://www.qnx.com/developers/docs. |
This chapter includes:
In this chapter, we'll take a look at the supplementary files used in the Neutrino development environment. Although we use the standard make command to create libraries and executables, you'll notice we use some of our own conventions in the Makefile syntax.
We'll start with a general description of a full, multiplatform source tree. Then we'll look at how you can build a tree for your products. Next. we'll discuss some advanced topics, including collapsing unnecessary levels and performing partial builds. Finally, we'll wrap up with some examples of creating Makefiles.
Although you're certainly not obliged to use our format for the directory structure and related tools, you may choose to use it because it's convenient for developing multiplatform code. If you do use this structure, you should use the addvariant command to create it; for more information, see the Utilities Reference as well as the examples at the end of this chapter.
Here's a sample directory tree for a product that can be built for two different operating systems (QNX 4 and Neutrino), on five CPU platforms (x86, MIPS, PowerPC, ARM, and SH4), with both endian combinations on the MIPS and PowerPC:
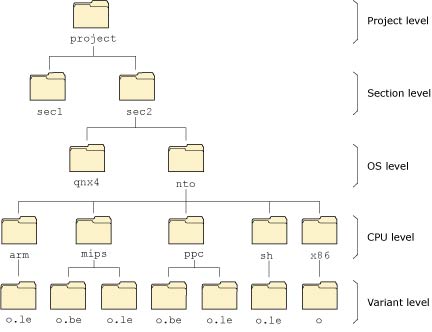
Source tree for a multiplatform project.
We'll talk about the names of the directory levels shortly. At each directory level is a Makefile file that the make utility uses to determine what to do in order to make the final executable.
However, if you examine the makefiles, you can see that most of them simply contain:
include recurse.mk
Why do we have makefiles at every level? Because make can recurse into the bottommost directory level (the variant level in the diagram). That's where the actual work of building the product occurs. This means that you could type make at the topmost directory, and it would go into all the subdirectories and compile everything. Or you could type make from a particular point in the tree, and it would compile only what's needed from that point down.
We'll discuss how to cause make to compile only certain parts of the source tree, even if invoked from the top of the tree, in the "Advanced topics" section.
 |
When deciding where to place source files, as a rule of thumb you should place them as high up in the directory tree as possible. This not only reduces the number of directory levels to traverse when looking for source, but also encourages you to develop source that's as generic as possible (i.e. that isn't specific to the OS, CPU, or board). Lower directory levels are reserved for more and more specific pieces of source code. |
If you look at the source tree that we ship, you'll notice that we follow the directory structure defined above, but with a few shortcuts. We'll cover those shortcuts in the "Advanced Topics" section.
As mentioned earlier, the makefile structure is almost identical, regardless of the level that the makefile is found in. All makefiles (except the bottommost level) include the recurse.mk file and may set one or more macros.
Here's an example of one of our standard (nonbottommost) Makefiles:
LATE_DIRS=boards
include recurse.mk
The recurse.mk file resides under $QNX_TARGET/usr/include/mk. This directory contains other files that are included within makefiles. Note that while the make utility automatically searches $QNX_TARGET/usr/include, we've created symbolic links from there to $QNX_TARGET/usr/include/mk.
The recurse.mk include file is typically used by higher-level makefiles to recurse into lower-level makefiles. All subdirectories present are scanned for files called makefile or Makefile. Any subdirectories that contain such files are recursed into, then make is invoked from within those directories, and so on, down the directory tree.
You can create a special file named Makefile.dnm ("dnm" stands for "Do Not Make") next to a real Makefile to cause recurse.mk not to descend into that directory. The contents of Makefile.dnm aren't examined in any way -- you can use touch to create an empty file for it.
The example given above uses the LATE_DIRS macro. Here are the macros that you can place within a makefile:
To give you some control over the ordering of the directories, the macros EARLY_DIRS and LATE_DIRS specify directories to recurse into before or after all others. You'd use this facility with directory trees that contain one directory that depends on another directory at the same level; you want the independent directory to be done first, followed by the dependent directory.
In our example above, we've specified a LATE_DIRS value of boards, because the boards directory depends on the library directory (lib).
Note that the EARLY_DIRS and LATE_DIRS macros accept a list of directories. The list is treated as a group, with no defined ordering within that group.
The LIST macro serves as a tag for the particular directory level that the makefile is found in.
The LIST macro can contain a list of names that are separated by spaces. This is used when we squash directory levels together; see "Advanced Topics," later in this chapter.
Here are the common values corresponding to the directory levels:
Note that you're free to define whatever values you wish -- these are simply conventions that we've adopted for the three directory levels specified. See the section on "More uses for LIST," below.
Once the directory has been identified via a tag in the makefile, you can specifically exclude or include the directory and its descendants in a make invocation. See "Performing partial builds," below.
The MAKEFILE macro specifies the name of the makefile that recurse.mk should search for in the child directories. Normally this is [Mm]akefile, but you can set it to anything you wish by changing the MAKEFILE macro. For example, in a GNU configure-style makefile, addvariant sets it to GNUmakefile (see "GNU configure," later in this chapter.
The CHECKFORCE macro is a trigger. Its actual value is unimportant, but if you set it, the recurse.mk file looks for Makefile.force files in the subdirectories. If it finds one, make recurses into that directory, even if the LIST macro settings would normally prevent this from happening.
Let's look at the directory levels themselves in some detail. Note that you can add as many levels as you want above the levels described here; these levels reflect the structure of your product. For example, in a factory automation system, the product would consist of the entire system, and you'd then have several subdirectories under that directory level to describe various projects within that product (e.g. gui, pidloop, robot_plc, etc.).
You use the project-level directory mainly to store the bulk of the source code and other directories, structuring these directories logically around the project being developed. For our factory-automation example, a particular project level might be the gui directory, which would contain the source code for the graphical user interface as well as further subdirectories.
You use the section-level directory to contain the source base relevant to a part of the project. You can omit it if you don't need it; see "Collapsing unnecessary directory levels," later in this chapter.
If you were building products to run on multiple operating systems, you'd include an OS-level directory structure. This would serve as a branchpoint for OS-specific subdirectories. In our factory-floor example, the gui section might be built for both QNX 4 and Neutrino, whereas the other sections might be built just for Neutrino.
If no OS level is detected, Neutrino is assumed.
Since we're building executables and libraries for multiple platforms, we need a place to serve as a branchpoint for the different CPUs. Generally, the CPU level contains nothing but subdirectories for the various CPUs, but it may also contain CPU-specific source files.
Finally, the variant level contains object, library, or executable files specific to a particular variant of the processor. For example, a MIPS processor could operate in big-endian or little-endian mode. In that case, we'd have to generate two different sets of output modules. On the other hand, an x86 processor is a little-endian machine only, so we need to build only one set of output modules.
At the project level, there's a file called common.mk. This file contains any special flags and settings that need to be in effect in order to compile and link.
At the bottommost level (the variant level), the format of the makefile is different -- it doesn't include recurse.mk, but instead includes common.mk (from the project level).
The common.mk include file is where you put the traditional makefile options, such as compiler options.
In order for the common.mk file to be able to determine which system to build the particular objects, libraries, or executables for, we analyze the pathname components in the bottommost level in reverse order as follows:
For example, if we have a pathname of /source/factory/robot_plc/driver/nto/mips/o.be, then the macros are set as follows:
| Macro | Value |
|---|---|
| VARIANT1 | o.be |
| CPU | mips |
| OS | nto |
| SECTION | driver |
| PROJECT | robot_plc |
The variant-level makefile (i.e. the bottommost makefile in the tree) contains the single line:
include ../../common.mk
The number of ../ components must be correct to get at the common.mk include file, which resides in the project level of the tree. The reason that the number of ../ components isn't necessarily the same in all cases has to do with whether directory levels are being collapsed.
You can combine variant names into a compound variant, using a period (.), dash (-), or slash (/) between the variants.
The common makefiles are triggered by a number of distinguished variant names:
If the compound variant doesn't include a, so, or dll, an executable is being built.
Variant names can be placed in any order in the compound variant, but to avoid confusing a source configuration management tool (e.g. CVS), make sure that the last variant in the list never looks like a generated file suffix. In other words, don't use variant names ending in .a, .so, or .o.
The following table lists some examples:
| Variant | Purpose |
|---|---|
| g.le | A debugging version of a little-endian executable. |
| so.be | A big-endian version of a shared object. |
| 403.be | A user-defined "403" variant for a big-endian system. |
|
The only valid characters for variant names are letters, digits, and underscores (_). |
In order for the source code to tell what variant(s) it's being compiled for, the common makefiles arrange for each variant name to be suffixed to the string VARIANT_ and have that defined as a C or assembler macro on the command line. For example, if the compound variant is so.403.be, the makefiles define the following C macros:
Note that neither VARIANT_be nor VARIANT_le is defined on a CPU that doesn't support bi-endian operation, so any endian-specific code should always test for the C macros __LITTLEENDIAN__ or __BIGENDIAN__ (instead of VARIANT_le or VARIANT_be) to determine what endian-ness it's running under.
We've described the pieces you'll provide when building your system, including the common.mk include file. Now let's look at some other include files:
We'll also look at some of the macros that these files set or use.
Since the common makefiles have a lot of defaults based on the names of various directories, you can simplify your life enormously in the common.mk include file if you choose your directory names to match what the common makefiles want. For example, if the name of the project directory is the same as the name of the image, you don't have to set the NAME macro in common.mk.
The prototypical common.mk file looks like this:
ifndef QCONFIG
QCONFIG=qconfig.mk
endif
include $(QCONFIG)

# Preset make macros go here

include $(MKFILES_ROOT)/qtargets.mk

# Post-set make macros go here
The qconfig.mk include file provides the root paths to various install, and usage trees on the system, along with macros that define the compilers and some utility commands that the makefiles use. The purpose of the qconfig.mk include file is to let you tailor the root directories, compilers, and commands used at your site, if they differ from the standard ones that we use and ship. Therefore, nothing in a project's makefiles should refer to a compiler name, absolute path, or command name directly. Always use the qconfig.mk macros.
The qconfig.mk file resides in $QNX_TARGET/usr/include/mk as qconf-os.mk (where os is the host OS, e.g. nto, qnx4, solaris, win32), which is a symbolic link from the place where make wants to find it (namely $QNX_TARGET/usr/include/qconfig.mk). You can override the location of the include file by specifying a value for the QCONFIG macro.
If you wish to override the values of some of the macros defined in qconfig.mk without modifying the contents of the file, set the QCONF_OVERRIDE environment variable (or make macro) to be the name of a file to include at the end of the main qconfig.mk file.
Before including qtargets.mk, you might need to set some macros to specify things like what additional libraries need to be searched in the link, the name of the image (if it doesn't match the project directory name), and so on. Do this in the area tagged as "Preset make macros go here" in the sample above.
Following the inclusion of qtargets.mk, you can override or (more likely) add to the macros set by qtargets.mk. Do this in the area tagged as "Post-set make macros go here" in the sample above.
Here's a summary of the macros available from qconfig.mk:
The which parameter can be either the string HOST for compiling something for the host system or a triplet of the form os_cpu_compiler to specify a combination of target OS and CPU, as well as the compiler to be used.
The os is usually the string nto to indicate Neutrino. The cpu is one of x86, mips, ppc, arm or sh. Finally, the compiler is usually gcc.
For example, you could use the macro CC_nto_x86_gcc to specify:
The following macro contains the command-line sequence required to invoke the GCC compiler:
CC_nto_x86_gcc = qcc -Vgcc_ntox86 -c
The various makefiles use the CP_HOST, LN_HOST, RM_HOST, TOUCH_HOST, and PWD_HOST macros to decouple the OS commands from the commands used to perform the given actions. For example, under most POSIX systems, the CP_HOST macro expands to the cp utility. Under other operating systems, it may expand to something else (e.g. copy).
In addition to the macros mentioned above, you can use the following macros to specify options to be placed at the end of the corresponding command lines:
The parameter "which" is the same as defined above: either the string "HOST" or the ordered triplet defining the OS, CPU, and compiler.
For example, specifying the following:
CCPOST_nto_x86_gcc = -ansi
causes the command line specified by CC_nto_x86_gcc to have the additional string "-ansi" appended to it.
The qrules.mk include file defines the macros used for compiling.
You can inspect -- and in some cases, also set -- the following macros when you use qrules.mk. Since the qtargets.mk file includes qrules.mk, these are available there as well. Don't modify those that are marked "(read-only)."
. $(INSTALL_ROOT_support)/$(OS)/$(CPUDIR)/lib $(USE_ROOT_LIB).
You'll almost never want to use this; use EXTRA_LIBVPATH to add paths instead.
OBJPREF_object = options
OBJPOST_object = options
The options string is inserted verbatim. Here's an example:
OBJPREF_libc_cut.a = -Wl,--whole-archive
OBJPOST_libc_cut.a = -Wl,--no-whole-archive
LIBPREF_library = options
LIBPOST_library = options
The options string is inserted verbatim.
You can use these macros to link some libraries statically and others dynamically. For example, here's how to bind libmystat.a and libmydyn.so to the same program:
LIBS += mystat mydyn

LIBPREF_mystat = -Bstatic
LIBPOST_mystat = -Bdynamic
This places the -Bstatic option just before -lmystat, and -Bdynamic right after it, so that only that library is linked statically.
Note that for the VFLAG_which, CCVFLAG_which, ASVFLAG_which, and LDVFLAG_which macros, the which part is the name of a variant. This combined macro is passed to the appropriate command line. For example, if there were a variant called "403," then the macro VFLAG_403 would be passed to the C compiler, assembler, and linker.
|
Don't use this mechanism to define a C macro constant that you can test in the source code to see if you're in a particular variant. The makefiles do that automatically for you. Don't set the *VFLAG_* macros for any of the distinguished variant names (listed in the "Recognized variant names" section, above). The common makefiles will get confused if you do. |
The qtargets.mk include file has the linking and installation rules.
You can inspect and/or set the following macros when you use qtargets.mk:
For example, you can use the PINFO NAME option to to keep a permanent record of the original filename of a binary. If you use this option, the name that you specify appears in the information from the use -i filename command. Otherwise, the information from use -i contains the NAME entry specified outside of the PINFO define.
For more information about PINFO, see the hook_pinfo() function described below for the GNU configure command.
In this section, we'll discuss how to:
The directory structure shown in the "Structure of a multiplatform source tree" section earlier in this chapter defines the complete tree -- every possible directory level is shown. In the real world, however, some of these directory levels aren't required. For example, you may wish to build a particular module for a PowerPC in little-endian mode and never need to build it for anything else (perhaps due to hardware constraints). Therefore, it seems a waste to have a variant level that has only the directory o.le and a CPU level that has only the directory ppc.
In this situation, you can collapse unnecessary directory components out of the tree. You do this by simply separating the name of the components with dashes (-) rather than slashes (/).
For example, in our source tree, let's look at the startup/boards/800fads/ppc-be makefile:
include ../common.mk
In this case, we've specified both the variant (as "be" for big-endian) and the CPU (as "ppc" for PowerPC) with a single directory.
Why did we do this? Because the 800fads directory refers to a very specific board -- it's not going to be useful for anything other than a PowerPC running in big-endian mode.
In this case, the makefile macros would have the following values:
| Macro | Value |
|---|---|
| VARIANT1 | ppc-be |
| CPU | ppc |
| OS | nto (default) |
| SECTION | 800fads |
| PROJECT | boards |
The addvariant command knows how to create both the squashed and unsquashed versions of the directory tree. You should always use it when creating the OS, CPU, and variant levels of the tree.
By using the LIST tag in the makefile, you can cause the make command to perform a partial build, even if you're at the top of the source tree.
If you were to simply type make without having used the LIST tag, all directories would be recursed into and everything would be built.
However, by defining a macro on make's command line, you can:
Or:
Let's consider an example. The following (issued from the top of the source tree):
make CPULIST=x86
causes only the directories that are at the CPU level and below (and tagged as LIST=CPU), and that are called x86, to be recursed into.
You can specify a space-separated list of directories (note the use of quoting in the shell to capture the space character):
make "CPULIST=x86 mips"
This causes the x86 and MIPS versions to be built.
There's also the inverse form, which causes the specific lists not to be built:
make EXCLUDE_CPULIST=ppc
This causes everything except the PowerPC versions to be built.
As you can see from the above examples, the following are all related to each other via the CPU portion:
Besides using the standard LIST values that we use, you can also define your own. Therefore, in certain makefiles, you'd put the following definition:
LIST=CONTROL
Then you can decide to build (or prevent from building) various subcomponents marked with CONTROL. This might be useful in a very big project, where compilation times are long and you need to test only a particular subsection, even though other subsections may be affected and would ordinarily be made.
For example, if you had marked two directories, robot_plc and pidloop, with the LIST=CONTROL macro within the makefile, you could then make just the robot_plc module:
make CONTROLLIST=robot_plc
Or make both (note the use of quoting in the shell to capture the space character):
make "CONTROLLIST=robot_plc pidloop"
Or make everything except the robot_plc module:
make EXCLUDE_CONTROLLIST=robot_plc
Or make only the robot_plc module for MIPS big-endian:
make CONTROLLIST=robot_plc CPULIST=mips VARIANTLIST=be
The addvariant utility knows how to work with code that uses a GNU ./configure script for configuration. If the current working directory contains files named configure and Makefile.in, addvariant automatically squashes the directory levels (as described earlier) into a single OS-CPU-VARIANT level and creates GNUmakefile files in the newly created directories along with a recursing Makefile.
After you've run addvariant, create an executable shell script called build-hooks in the root of the project. This file needs to define one or more of the following shell functions (described in more detail below):
Every time that you type make in one of the newly created directories, the GNUmakefile is read (a small trick that works only with GNU make). GNUmakefile in turn invokes the $QNX_TARGET/usr/include/mk/build-cfg script, which notices whether or not configure has been run in the directory:
If a function isn't defined in build-hooks, build-cfg doesn't bother trying to invoke it.
Within the build-hooks script, the following variables are available:
This function is invoked just before we run the project's configure script. Its main job is to set the configure_opts variable properly. Here's a fairly complicated example (this is from GCC):
# The "target" variable is the compilation target: "ntoarm", "ntox86", etc.
function hook_preconfigure {
    case ${SYSNAME} in
    nto)
        case "${target}" in
        nto*)   basedir=/usr ;;
        *)      basedir=/opt/QNXsdk/host/qnx6/x86/usr ;;
        esac
        ;;
    solaris)
        host_cpu=$(uname -p)
        case ${host_cpu} in
        i[34567]86) host_cpu=x86 ;;
        esac
        basedir=/opt/QNXsdk/host/solaris/${host_cpu}/usr
        ;;
    *)
        echo "Don't have config for ${SYSNAME}"
        exit 1
        ;;
    esac
    configure_opts="${configure_opts} --target=${target}"
    configure_opts="${configure_opts} --prefix=${basedir}"
    configure_opts="${configure_opts} --exec-prefix=${basedir}"
    configure_opts="${configure_opts} --with-local-prefix=${basedir}"
    configure_opts="${configure_opts} --enable-haifa"
    configure_opts="${configure_opts} --enable-languages=c++"
    configure_opts="${configure_opts} --enable-threads=posix"
    configure_opts="${configure_opts} --with-gnu-as"
    configure_opts="${configure_opts} --with-gnu-ld"
    configure_opts="${configure_opts} --with-as=${basedir}/bin/${target}-as"
    configure_opts="${configure_opts} --with-ld=${basedir}/bin/${target}-ld"
    if [ ${SYSNAME} == nto ]; then
        configure_opts="${configure_opts} --enable-multilib"
        configure_opts="${configure_opts} --enable-shared"
    else
        configure_opts="${configure_opts} --disable-multilib"
    fi
}
This is invoked after configure has been successfully run. Usually you don't need to define this function, but sometimes you just can't quite convince configure to do the right thing, so you can put some hacks in here to fix things appropriately. For example, again from GCC:
function hook_postconfigure {
    echo "s/^GCC_CFLAGS *=/&-I\$\(QNX_TARGET\)\/usr\/include /"  >/tmp/fix.$$
    if [ ${SYSNAME} == nto ]; then
        echo "s/OLDCC = cc/OLDCC = .\/xgcc -B.\/ -I \$\(QNX_TARGET\)\/usr\/include/" >>/tmp/fix.$$
        echo "/^INCLUDES = /s/\$/ -I\$\(QNX_TARGET\)\/usr\/include/" >>/tmp/fix.$$
        if [ ${target} == ntosh ]; then
            # We've set up GCC to support both big and little endian, but
            # we only actually support little endian right now. This will
            # cause the configures for the target libraries to fail, since
            # it will test the compiler by attempting a big endian compile
            # which won't link due to a missing libc & crt?.o files.
            # Hack things by forcing compiles/links to always be little endian
            sed -e "s/^CFLAGS_FOR_TARGET *=/&-ml /"  <Makefile >1.$$
            mv 1.$$ Makefile
        fi
    else
        # Only need to build libstdc++ & friends on one host
        rm -Rf ${target}

        echo "s/OLDCC = cc/OLDCC = .\/xgcc -B.\//" >>/tmp/fix.$$
    fi
    cd gcc
    sed -f/tmp/fix.$$ <Makefile >1.$$
    mv 1.$$ Makefile
    cd ..
    rm /tmp/fix.$$
}
This function is invoked just before the make. You don't usually need it.
This function is invoked just after the make. We haven't found a use for this one yet, but included it for completeness.
This function is invoked after hook_postmake(). Theoretically, we don't need this hook at all and we could do all its work in hook_postmake(), but we're keeping it separate in case we get fancier in the future.
This function is responsible for generating all the *.pinfo files in the project. It does this by invoking the gen_pinfo() function that's defined in build-cfg, which generates one .pinfo. The command line for gen_pinfo() is:
gen_pinfo [-nsrc_name ] install_name install_dir pinfo_line...
The arguments are:
Here's an example from the nasm project:
function hook_pinfo {
    gen_pinfo nasm    usr/bin LIC=NASM DESCRIPTION="Netwide X86 Assembler"
    gen_pinfo ndisasm usr/bin LIC=NASM DESCRIPTION="Netwide X86 Disassembler"
}
As mentioned earlier, if you use our directory structure, you should use the addvariant command to create it. This section gives some examples of creating Makefiles for a single application, as well as for a library and an application.
Suppose we have a product (we'll use the archiver, lha for this example) that we'd like to make available on all the processors that QNX Neutrino supports. Unfortunately, we've been using our own custom Makefiles for gcc on x86, and we have no idea how to make binaries for other processors.
The QNX Neutrino Makefile system makes it very easy for us to build different processor versions. Instead of writing the entire complicated Makefile ourselves, we simply include various QNX Neutrino Makefile system files that will do most of the work for us. We just have to make sure the correct variables are defined, and variants are created.
First, let's get the source code for lha from http://www2m.biglobe.ne.jp/~dolphin/lha/prog/lha-114i.tar.gz and unarchive it:
tar -zxvf lha-114i.tar.gz
This creates a directory called lha-114i. If we run make here, everything will compile, and when it's done, we'll have a x86 binary called lha in the src directory.
A typical compile command for this application using the original Makefile looks like:
gcc -O2 -DSUPPORT_LH7 -DMKSTEMP -DNEED_INCREMENTAL_INDICATOR \
  -DTMP_FILENAME_TEMPLATE=""/tmp/lhXXXXXX"" \
  -DSYSTIME_HAS_NO_TM -DEUC -DSYSV_SYSTEM_DIR -DMKTIME \
  -c -o lharc.o lharc.c
We want to make sure our version compiles with the same options as the original version, so we have to make sure to include those compiler options somewhere.
Let's save the current Makefile as a backup:
cd src
mv Makefile Makefile.old
As mentioned above, we need to define some variables in a file somewhere that our Makefiles can include. The usual place to put these defines is in a common.mk file. We can use the addvariant utility to create our initial common.mk and new Makefile, like this:
addvariant -i OS
Let's go through the common.mk file line by line to figure out what's going on, and what we need to add:
ifndef QCONFIG
QCONFIG=qconfig.mk
endif
include $(QCONFIG)
You should never change these four lines. The default qconfig.mk defines a number of variables that the Makefile system uses.
After these lines, we can define our own variables. Let's start with:
INSTALLDIR=usr/bin
This defines where to install our binary. Third-party applications should go into usr/bin instead of bin, which is the default.
Next, we put in some packager info:
define PINFO
PINFO DESCRIPTION=Archiver using lha compression.
endef
If we define PINFO information like this in our common.mk file, a lha.pinfo file will be created in each of our variant directories. We'll look at this later.
After that, we add:
NAME=lha
This tells the Makefile system what the name of our project is. Since we're building binary executables, this will be the name of our binary.
#EXTRA_INCVPATH=$(PROJECT_ROOT)/includes
EXTRA_INCVPATH defines where our header files are located. By default, all the directories from our PROJECT_ROOT down to our variant directory are added to the main include paths (i.e. where it will look for header files.) In our case, all the project headers are located in the project's root directory, so we don't need an EXTRA_INCVPATH line. This commented-out line serves as an example.
EXCLUDE_OBJS=lhdir.o makezero.o
Ordinarily, all the source code files in the PROJECT_ROOT directory are compiled and linked to the final executable. If we want to exclude certain files from being compiled and linked, we specify the object files in EXCLUDE_OBJS.
CCFLAGS=-O2 -DSUPPORT_LH7 -DMKSTEMP -DNEED_INCREMENTAL_INDICATOR
  -DTMP_FILENAME_TEMPLATE=""/tmp/lhXXXXXX"" -DSYSTIME_HAS_NO_TM
  -DEUC -DSYSV_SYSTEM_DIR -DMKTIME
CCFLAGS defines the compiler flags. This is where we put the original compiler flags listed above.
That's all we need to add to get up and running. The last line in our common.mk file is:
include $(MKFILES_ROOT)/qtargets.mk
This does all the magic that figures out which CPU compiler to use, what binary to make, etc. You should never change this line.
Here's what our complete common.mk file looks like:
ifndef QCONFIG
QCONFIG=qconfig.mk
endif
include $(QCONFIG)

INSTALLDIR=usr/bin
define PINFO
PINFO DESCRIPTION=Archiver using lha compression.
endef
NAME=lha
#EXTRA_INCVPATH=$(PROJECT_ROOT)/includes
EXCLUDE_OBJS=lhdir.o makezero.o
CCFLAGS=-O2 -DSUPPORT_LH7 -DMKSTEMP -DNEED_INCREMENTAL_INDICATOR
  -DTMP_FILENAME_TEMPLATE=""/tmp/lhXXXXXX"" -DSYSTIME_HAS_NO_TM
  -DEUC -DSYSV_SYSTEM_DIR -DMKTIME

include $(MKFILES_ROOT)/qtargets.mk
That's it for the common.mk file. We'll see where it is included in Makefiles shortly. How about the Makefile that was just created for us? We'll very rarely have to change any of the Makefiles. Usually they just contain a LIST= line, depending on where they are in our directory tree, and some Makefile code to include the appropriate file that makes the recursion into subdirectories possible. The exception is the Makefile at the very bottom. More on this later.
We'll have to have a usage description for our application as well. In our case, we can get a usage message simply by running lha without any parameters, like this:
./lha 2> lha.use
For our final binaries, when someone types use lha (assuming lha is in their path), they'll get the proper usage message.
As described earlier in this appendix, we use a lot of subdirectories. Here are the ones we need:
| Directory | Level |
|---|---|
| nto | OS |
| nto/x86/ | CPU |
| nto/x86/o | Variant |
Unless we'll be releasing for QNX 4 as well as Neutrino, we'll need only the nto directory for the OS level. For the CPU level, we'll have directories for anything we want to support: ARM, SH, PPC, MIPS, and/or x86.
The final variant directory depends on what we're building, and what endian-ness we want to compile for:
We're building just an executable binary, so we use the o variant. Each directory and subdirectory needs to have a Makefile. Again, for most of them we're simply including the recurse.mk file, which contains everything needed to recurse down our tree until we get to the o* directory, as well as setting a LIST variable, which for general use indicates where we are in our Makefile tree. For example, if the directory contains variants, LIST is set to VARIANT.
Let's use the addvariant utility to create a directory tree and appropriate Makefiles for our various CPUs and variants. The addvariant utility can do more than just add variants, but in our case, that's all we need it for. We create a variant by running:
addvariant nto
Let's do this for each of our CPUs, like this:
addvariant nto arm o.le
addvariant nto sh o.le
addvariant nto mips o.le
addvariant nto mips o.be
addvariant nto ppc o.be
addvariant nto x86 o
If we look at the Makefile in the lha-114i/src/nto/x86/o directory, we see it just contains:
include ../../../common.mk
Since this is the bottom directory, we don't need to recurse any further, but rather we want to include the common.mk file we created earlier. We also don't need a LIST variable, since we have no subdirectories at this point. We now have a complete QNX Neutrino-style Makefile tree.
What if we want to distribute shared libraries (again for all the CPUs we can) and a development package as well? Let's use the bzip2 distribution as our example. The bzip2 binary already comes with QNX Neutrino, but the library doesn't. You can download the source code from http://www.bzip.org.
This is a good example, because it contains both a library (libbz2) and an application (bzip2). Once we've downloaded it, we can extract and build it with:
tar -zxvf bzip2-1.0.3.tar.gz
cd bzip2-1.0.3
make
We notice that a typical compile looks like:
gcc -Wall -Winline -O2 -fomit-frame-pointer -fno-strength-reduce
  -D_FILE_OFFSET_BITS=64 -c decompress.c
Let's remember those options for later.
The problem with using the QNX Neutrino makefile system in this case, is that we want to make two projects: the libbz2 library and the bzip2 application. With the QNX Neutrino Makefile system, we usually have a single project.
The best solution is to separate them into different directories. Instead of moving the source code around, we'll just create two subdirectories, one called lib, and the other called app, in which we'll create the appropriate Makefile and common.mk files:
mkdir app
cd app
addvariant -i OS
addvariant nto arm o.le
addvariant nto sh o.le
addvariant nto mips o.le
addvariant nto mips o.be
addvariant nto ppc o.be
addvariant nto x86 o
cd ..
mkdir lib
cd lib
addvariant -i OS
addvariant nto arm so.le
addvariant nto arm a.le
addvariant nto sh so.le
addvariant nto sh a.le
addvariant nto mips so.le
addvariant nto mips so.be
addvariant nto mips a.le
addvariant nto mips a.be
addvariant nto ppc so.be
addvariant nto ppc a.be
addvariant nto x86 so
addvariant nto x86 a
If we try to build either of these projects now, not much happens. This is because we haven't told the Makefile system where our source files are.
Let's start with the library. Its common.mk file already contains the default lines:
ifndef QCONFIG
QCONFIG=qconfig.mk
endif
include $(QCONFIG)

include $(MKFILES_ROOT)/qtargets.mk
Let's add a few more lines just before the line that includes qtargets.mk. First, we'll add the compile options it used originally:
CCFLAGS+=-Wall -Winline -O2 -fomit-frame-pointer -fno-strength-reduce
  -D_FILE_OFFSET_BITS=64
Next, let's tell it where to find the source files. The PRODUCT_ROOT directory is the parent directory of the PROJECT_ROOT directory, which is where our source code is located. Let's use that to specify where our source code is:
EXTRA_SRCVPATH=$(PRODUCT_ROOT)
Since the parent directory also contains the source code for the bzip2 application, and we want only the object files for the libbz library, let's weed out the object files we don't need:
EXCLUDE_OBJS=bzip2recover.o bzip2.o dlltest.o spewG.o unzcrash.o
We should add some PINFO definitions and specify where to install the files (usr/lib in this case):
define PINFO
PINFO DESCRIPTION=bzip2 data compressions library
endef
INSTALLDIR=usr/lib
Finally, let's make sure the library has the correct name. By default, it uses the directory name of the PROJECT_ROOT directory. Since we don't want to call our library lib, let's change it:
NAME=bz2
If we now run make at the terminal, we can watch all of our libraries being built.
|
You may notice that there are libbz2S.a libraries being built in the so directories. You can use these libraries if you want to create other shared libraries that require code from this library. |
What about our application, bzip2? Let's change into the app directory we built before and set up our common.mk file. This time, though, we exclude everything but the bzip2.o from our objects and add a new line:
LIBS+=bz2
Here's our complete common.mk file:
ifndef QCONFIG
QCONFIG=qconfig.mk
endif
include $(QCONFIG)

CCFLAGS+=-Wall -Winline -O2 -fomit-frame-pointer -fno-strength-reduce
  -D_FILE_OFFSET_BITS=64
EXTRA_SRCVPATH=$(PRODUCT_ROOT)
EXCLUDE_OBJS= blocksort.o bzip2recover.o bzlib.o compress.o crctable.o
   decompress.o dlltest.o huffman.o randtable.o spewG.o unzcrash.o
LIBS+=bz2
define PINFO
PINFO DESCRIPTION=bzip2 file compressor/decompressor
endef
INSTALLDIR=usr/bin
NAME=bzip2

include $(MKFILES_ROOT)/qtargets.mk
We can easily create our bzip2.use file by getting help from our previously created bzip2 executable:
../bzip2 --help 2> bzip2.use
Now we can build our binaries, and make sure they exist:
make
ls -l nto/*/*/bzip2
|
|
|
|