![[Previous]](prev.gif) |
![[Contents]](contents.gif) |
![[Index]](keyword_index.gif) |
![[Next]](next.gif) |
|
|
|
|
 |
This version of this document is no longer maintained. For the latest documentation, see http://www.qnx.com/developers/docs. |
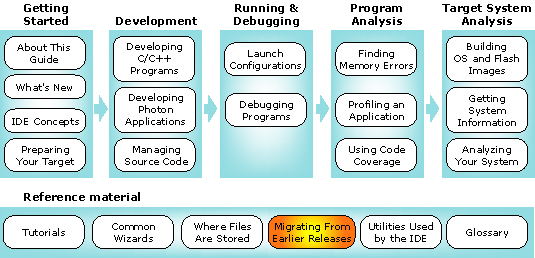
You can select a topic from this diagram:
You can easily migrate your old workspace and projects to this release.
In this chapter:
Upgrading from a previous version of the IDE involves two basic steps:
Step 1 -- converting your development workspace to be compliant with the latest version of the IDE framework. The IDE performs this process automatically at startup when it detects an older workspace version.
 |
You can redirect the IDE to point at different workspaces
by launching it with this command:
qde -data path_to_workspace |
Step 2 -- converting your individual projects. Depending on which version of the IDE framework you're migrating from (6.2.0, 6.2.1, or 6.3), you'll have to take different steps to convert your projects.
You can upgrade to IDE 4.0 from 6.3.0 SP1, SP2, or SP3 -- whether or not you've also installed the QNX Neutrino Core OS 6.3.2. The information for migrating from 6.3.0 to SP2 or SP3 still applies; see below.
Note the following:
In addition to the many fixes and enhancements to the QNX plugins, Service Pack 2 (which is also incorporated in Service Pack 3) introduces a completely new version of the IDE, based on Eclipse 3 and CDT 2.
For a list of new workbench features, see "What's New in 3.0" in the Workbench User Guide ().
For a list of new CDT features, see "What's new in the CDT?" in the C/C++ Development User Guide ().
In addition to information about migrating your workspace and your projects, this section includes some issues you might run into.
Your workspace is automatically upgraded the first time you launch the new IDE. This process is entirely automated and cannot be prevented. If you need to revert to an older version of the IDE, be sure to read the "Reverting to an older IDE" section.
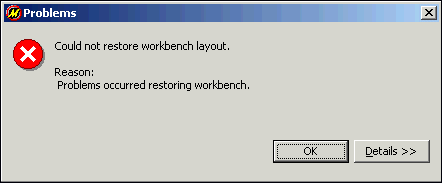
You will receive an error message during this process with the following text:
"Could not restore Workbench layout. Reason: Problems occurred restoring workbench."
This message is caused by internal changes to many of the perspectives commonly used for C/C++ development. You can safely ignore this error.
To prevent this error from coming up every time you load the IDE (and to prevent a similar error when you exit the IDE):
|
This error reappears later if you open a perspective that's currently closed, but that had been used at some point in the older IDE. Use this same process to get rid of the error message. |
Resetting the existing perspectives also gives you full access to all of the new features available in views that were open in those perspectives.
Like your existing workspace, your projects are automatically upgraded to take advantage of the new IDE.
To complete the migration of your projects to the new IDE:
This section describes the following issues:
If you have the Intel C/C++ Compiler installed, you need to update the Error Parser tab in the Properties dialog for each of your projects using ICC.
In the list of error parsers, you'll notice a selected blank entry, and an unselected entry for the ICC error parser:
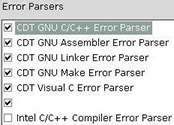
The selected blank entry is for the 6.3.0 ICC error parser, and the new ICC error parser is the 6.3.0 Service Pack 2 error parser.
If you're using a 6.3.0 workspace instead of a new 6.3.0 Service Pack 2 workspace, you may receive errors when performing a file search ():

You can ignore this error; it doesn't affect the search results.
To get rid of this error when doing file searches, create a new workspace and import your previous projects into the new workspace.
When you load an existing project created with an older version of the IDE, the IDE updates the project to take advantage of new features. This can cause problems if you try to load the project into an older version of the IDE.
If you plan to revert to an older version of the IDE, you need to make a backup copy of your workspace before using the new version of the IDE.
Your workspace is located in C:/QNX630/workspace under Windows, or ~/workspace under QNX, Linux, and Solaris.
|
Don't use cp to back up your workspace under Windows; use xcopy or an archiving/backup utility. |
You can also import an existing project to an older version of the IDE:
If you're missing new features in context menus, such as the ones available in the C/C++ Projects perspective, or if you're missing standard views, such as the Problems view in the C/C++ Development perspective, you need to reset your perspective.
To reset your perspective, follow the instructions in the "Migrating your workspace" section.
By default, the QNX System Builder perspective's Console view doesn't automatically switch to the front when building. In the new IDE, changed views change the style of the view title.
If you prefer the old behavior and want the Console view to automatically come to the front during a build:
Because of the internal data structure changes, launch configurations created with an older version of the IDE won't automatically switch to the Debug perspective when used as a debug configuration.
To fix this problem:
|
This conversion is a one-way process. Although your data files remain intact, you won't be able to use this workspace with earlier versions of the IDE. |
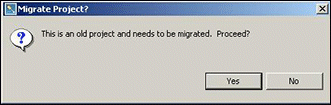
Click Yes to update your System Builder project, or No to leave it in the 6.2.1 format. You won't be able to use the project with the 6.3 IDE unless you update it.
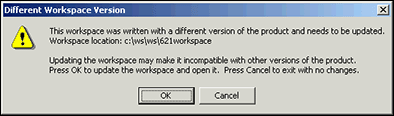
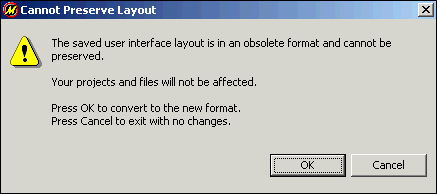
This is to be expected, because we upgraded the minor version of installed components, so there may be some UI adjustments. Click OK.
Now you're ready to migrate your existing projects to 6.3.0.
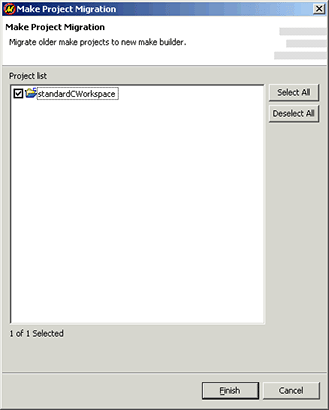
If the 6.3.0 IDE detects any 6.2.1 Standard Make C/C++ projects at startup, you'll be prompted to convert these projects to the new format:

You must run this conversion process over each 6.2.1 project so it can take full advantage of the new features of the C/C++ Development Tools.
|
QNX C/C++ projects are automatically converted to the new project format. |
At startup, the conversion wizard automatically checks for projects to convert. Note that you can convert older projects that were never in the workspace (e.g. projects you've brought in via a revision control system).
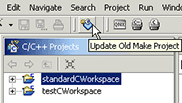
The IDE then adds an icon (Update Old Make Project) to the toolbar so you can launch the conversion wizard. The icon is activated whenever you select projects that are candidates for conversion.
The conversion wizard looks like this:
This is to be expected, because we upgraded the major, incompatible versions of installed components and of the workspace itself. Click OK.
Now you're ready to migrate your existing projects to 6.3.0.
The format of 6.2.0 C/C++ projects (including QNX projects) is incompatible with the 6.3.0 format -- you must follow these steps to convert your old projects:
Use the appropriate conversion wizard:
| For this type of project: | Open this wizard: |
|---|---|
| Standard C/C++ | |
| QNX C/C++ |
|
Many project options have changed from QNX Momentics 6.2.0 to QNX Momentics 6.3.0. Although the conversion process attempts to maintain configuration options, you should verify your individual project files to make sure any new settings have been initialized to the values you want. |
|
|
|
|