![[Previous]](prev.gif) |
![[Contents]](contents.gif) |
![[Index]](keyword_index.gif) |
![[Next]](next.gif) |
|
|
|
|
 |
This version of this document is no longer maintained. For the latest documentation, see http://www.qnx.com/developers/docs. |
This chapter includes:
What exactly happens when you start up your system depends on the hardware; this chapter gives a general description.
 |
You need to log in as root in order to change any of the files that the system runs when it starts up. |
When you boot your system, the CPU is reset, and it executes whatever is at its reset vector. This is usually a BIOS on x86 boxes, but on other platforms it might be a ROM monitor, or it might be a direct jump into some IPL code for that board. After a ROM monitor runs, it generally jumps to the IPL, and a BIOS might do this as well -- or it might jump directly to the start of the OS image.

Booting a Neutrino system.
The IPL copies the boot image into memory and jumps to the startup. The startup code initializes the hardware, fills the system page with information about the hardware, loads callout routines that the kernel uses for interacting with the hardware, and then loads and starts the microkernel and process manager, procnto (which, starting with release 6.3.0, also manages named semaphores). IPL and startup for a board are generally part of a Board Support Package (BSP) for a particular board.
After procnto has completed its initialization, it runs the commands supplied in the boot script, which might start further customization of the runtime environment either through a shell script or through some program written in C, C++, or a combination of the two.
On a non-x86 disk-booted system, that's pretty well how it happens: most customization is done in the boot script or in a shell script that it calls. For more details, see Making an OS Image in Building Embedded Systems.
For an x86 BIOS boot, this becomes more complex:

Booting a Neutrino system with an x86 BIOS.
After gaining control, the BIOS configures the hardware, and then it scans for BIOS extension signatures (0x55AA). It calls each BIOS extension (e.g. a network card with a boot ROM or hard disk controller) until one of them boots the system. If none of the BIOS extensions boots the system, the BIOS presents some (usually strange) failure message.
For the network boot case, the boot ROM (usually bootp) downloads an image from a server, copies it into memory, then jumps to the start of the image. The boot image generally needs to run a network stack, and starts some sort of network filesystem to retrieve or access additional programs and files.
You can use the mkifs utility to create the OS image. For a sample buildfile for this sort of image, see the Examples appendix.
For a disk-based boot of a Neutrino desktop system, the process of booting, and especially system initialization, is more complex. After the BIOS has chosen to boot from the disk, the primary boot loader (sometimes called the partition loader) is called. This loader is "OS-agnostic;" it can load any OS. The one installed by Neutrino installations displays the message:
Press F1-F4 to select drive or select partition 1,2,3? 1
After a short timeout, it boots whatever OS system is in the partition prompted for. This loader is /boot/sys/ipl-diskpc1. You can write a loader onto a disk by using dloader.
When you choose a QNX partition, the secondary boot loader (sometimes called the OS loader) starts. This loader is Neutrino-specific and resides on the QNX partition. It displays the message:
Hit Esc for .altboot
If you let it time out, the loader loads the operating system image file from /.boot; if you press Escape, the loader gets the image from /.altboot instead. As the loader reads the image, it prints a series of periods. If an error occurs, the loader prints one of the following characters, and the boot process halts:
The only difference between the default installed images is that /.boot uses DMA for accessing the EIDE controller, while /.altboot doesn't.
You can find the buildfiles for these images in /boot/build:
You can't rename, unlink, or delete /.boot and /.altboot, although you can change the contents or copy another file to these files. For example, these commands don't work:
mv /.altboot oldaltboot
mv newboot /.altboot
but these do:
cp /.altboot oldaltboot
cp newboot /.altboot
|
If you modify your boot image, it's a good idea to copy your working image from /.boot to /.altboot, then put your new image in /.boot. That way, if you make a mistake, you can press Escape when you next boot, and you'll have a working image for recovery. |
The buildfile for the default .boot image, qnxbasedma.build, includes these lines:
[+script] startup-script = {
    # To save memory make everyone use the libc in the boot image!
    # For speed (less symbolic lookups) we point to libc.so.2 instead
    # of libc.so
    procmgr_symlink ../../proc/boot/libc.so.2 /usr/lib/ldqnx.so.2

    # Default user programs to priority 10, other scheduler (pri=10o)
    # Tell "diskboot" this is a hard disk boot (-b1)
    # Tell "diskboot" to use DMA on IDE drives (-D1)
    # Start 4 text consoles by passing "-n4" to "devc-con" (-o)
    # By adding "-e" Linux ext2 filesystem will be mounted as well.
    [pri=10o] PATH=/proc/boot diskboot -b1 -D1 -odevc-con,-n4
}
This script starts the system by running diskboot, a program that's used on disk-based systems to boot Neutrino. For the entire qnxbasedma.build file, see the Examples appendix.
|
When diskboot starts, it prompts:
Press the space bar to input boot options...
Most of these options are for debugging purposes. The diskboot program looks for a Neutrino partition to mount, then runs a series of script files to initialize the system:

Initialization done by diskboot.
The main script for initializing the system is /etc/system/sysinit; you usually keep local system initialization files in the /etc/rc.d directory. For example, if you want to run extra commands at startup on a node, say to mount an NFS drive, you might create a script file named rc.local, make sure it's executable, and put it in the /etc/rc.d directory. For more information, see the description of rc.local later in this chapter.
Here's what diskboot does:
|
If you want to pass any options to devb-eide or other drivers, pass them to diskboot in your buildfile. |
These are mounted as /fs/cdx for CD-ROMs, and /fs/hdx-type-y, where x is a disk number (e.g. /fs/cd0, /fs/hd1), and y is added for uniqueness as it counts upwards. For example, the second DOS partition on hard drive 1 would be /fs/hd1-dos-2.
By default, one QNX 4 partition is mounted as / instead. This is controlled by looking for a .diskroot file on each QNX 4 partition. If only one such partition has a .diskroot file specifying a mountpoint of /, that partition is unmounted as /fs/hdx-type-y and is then mounted as /; if more than one is found, then diskboot prompts you to select one.
The .diskroot file is usually empty, but it can contain some commands. For more information, see below.
The diskboot program uses the .diskroot file to determine which QNX 4 partition to mount as /. The .diskroot file can be one of:
/home
The line must not start with a number sign (#) or contain an equals sign (=). The diskboot program ignores any leading and trailing whitespace.
token = value
The diskboot program ignores any whitespace at the start and end of the line, and on either side of the equals sign.
The recognized tokens are:
mount = /home
options = ro,noexec
For more information, see the documentation for mount and specific drivers in the Utilities Reference, and mount() and mount_parse_generic_args() in the Neutrino Library Reference.
The /etc/system/sysinit file is a script that starts up the main system services. In order to edit this file, you must log in as root.
|
Before you change the sysinit script, make a backup copy of the latest working version. If you need to create the script, remember to make it executable before you use it (see chmod in the Utilities Reference). |
The sysinit script does the following:
|
Starting with release 6.3.0, procnto* manages named semaphores, which mqueue used to do (and still does, if it detects that procnto isn't doing so). |
We recommend that you set the hardware clock to UTC time and use the _CS_TIMEZONE configuration string or the TZ environment variable to specify your time zone. The system displays and interprets local times and automatically determines when daylight saving time starts and ends.
This means that you can have dial-up users in different time zones on the same computer, and they can all see the correct current local time. It also helps when transmitting data from time zone to time zone. You stamp the data with the UTC time stamp, and all of the computers involved should have an easy time comparing time stamps in one time zone to time stamps in another.
Some operating systems, such as Windows, set the hardware clock to local time. If you install Windows and Neutrino on the same machine, you should set the hardware clock to local time by executing the following command as root and putting it into /etc/rc.d/rc.rtc:
rtc -l hw
If you're using Photon, you can just uncheck The hardware clock uses UTC/GMT in phlocale; if you do that, the program creates a rc.rtc file for you that contains the above command.
|
A hostname can consist only of letters, numbers, and hyphens, and must not start or end with a hyphen. For more information, see RFC 952. |
Neutrino uses a device enumerator manager process, enum-devices, to detect all known hardware devices on the system and to start the appropriate drivers. It's called by the /etc/rc.d/rc.devices script, which /etc/system/sysinit invokes.
The enum-devices manager uses a series of configuration files to specify actions to take when the system detects specific hardware devices. After it reads the configuration file(s), enum-devices queries its various enumerators to discover what devices are on the system. It then matches these devices against the device IDs listed in the configuration files. If the device matches, the action clauses associated with the device are executed. You can find the enumerator configuration files in the /etc/system/enum directory.
Here's some sample code from a configuration file:
device(pci, ven=2222, dev=1111)
    uniq(sernum, devc-ser, 1)
    driver(devc-ser8250,  "-u$(sernum) $(ioport1),$(irq)" )
This code directs the enumerator to do the following when it detects device 1111 from vender 2222:
To detect new hardware or specify any additional options, you can extend the enumerator configuration files in the following ways:
as described below.
The enumerator reads and concatenates the contents of all configuration files under the chosen directory before it starts processing.
For details on the different command-line options and a description of the syntax for the configuration files, see enum-devices in the Utilities Reference.
If you're an OEM, and you've written any device drivers, create an oem file or directory under /etc/system/enum to contain the definitions for the devices.
If you need to set up devices or options that are specific to your particular system configuration, create an overrides file or directory under /etc/system/enum. The enumerator includes the overrides file or directory last and adds any definitions in it to the set that enum-devices works with. If the overrides file has something that a previously included file also has, the later definition wins.
For example:
device(pci, ven=1234, dev=2000)
device(pci, ven=1234, dev=2001)
    requires( $(IONET_CMD), )
    uniq(netnum, devn-en, 0)
    mount(-Tio-net  /lib/dll/devn-pcnet.so, "/dev/io-net/en$(netnum)")

device(pci, ven=1234, dev=2002)
device(pci, ven=1234, dev=2003)
The first block of this code specifies to do the following if the enumerator detects devices 2000 and 2001 from vendor 1234:
The second block of code tells the enumerator to do nothing if it detects devices 2002 or 2003 from vendor 1234.
|
When you add device entries to prevent devices from being enumerated, make sure that there aren't any action clauses after them. Any group of actions clauses found after any single or set of device entries is used for those devices. Place these device entries at the end of your overrides configuration file. |
io-net -ptcpip
If you want to enable IPSec, add this code to your overrides file:
all
        set(IONET_CMD, io-net -ptcpip ipsec)
To further customize the enumerators for your system configuration, you can create a /etc/host_cfg/$HOSTNAME/system/enum directory. If this directory structure exists, the rc.devices script tells the enumerators to read configuration files from it instead of from /etc/system/enum.
|
Even if you have a /etc/host_cfg/$HOSTNAME/system/enum directory, the enumerator looks for an oem directory and overrides file under /etc/system/enum. |
An easy way to set up the directory is to copy the /etc/system/enum directory (including all its subdirectories) to your /etc/host_cfg/$HOSTNAME/system directory and then start customizing.
The /etc/system/sysinit script runs /etc/rc.d/rc.sysinit to do local initialization of your system.
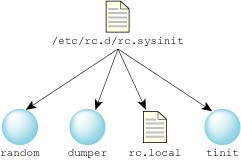
Initialization done by /etc/rc.d/rc.sysinit.
The rc.sysinit script does the following:
As described above, rc.sysinit runs /etc/host_cfg/$HOSTNAME/rc.d/rc.local or /etc/rc.d/rc.local, if the file exists and is executable.
You can use the rc.local file to customize your startup by:
You can also use rc.local to slay running processes and restart them with different options, but this is a heavy-handed approach. Instead of doing this, modify the device enumeration to start the processes with the correct options. For more information, see "Device enumeration," earlier in this chapter.
For example, you can:
/usr/photon/bin/Photon -l '/usr/photon/bin/phlogin -O -Uuser:password'
Note that you have to put your password as plain text in your rc.local, but presumably you aren't concerned with security if you want to bypass the login prompt.
The -O option to phlogin brings you back to text mode when you terminate your Photon session; without the -O, pressing Ctrl-Shift-Alt-Backspace simply logs you in again.
Alternatively, you can set up a user's .profile to start Photon (with the ph command), and then add this command to your rc.local file:
login -f user_name
For more information, see login in the Utilities Reference.
Don't use the rc.local file to to set up environment variables, because there's another shell that starts after this script is run, so any environment variable that you set in this file disappears by the time you get a chance to log in.
|
After you've created rc.local, make
sure that you set the executable bit on the file with the command:
chmod +x rc.local |
The tinit program initializes the terminal, as follows:
For more information, including a description of /etc/config/ttys, see tinit in the Utilities Reference.
Here are some problems you might encounter while customizing how your system starts up:
chmod +x /etc/rc.d/rc.local
Or:
Once you're in the debug shell ( fesh), enter the exit command, then wait for the second shell prompt. Type this command:
export PATH=/bin:/usr/bin:/sbin:/usr/sbin
You can then correct your rc.local, or move it out of the way so that you can boot without it:
cd /etc/rc.d
cp rc.local rc.local.bad
rm rc.local
|
|
|
|